Quick Start Guide (iOS)
To use the middleware you will need a Castles MP-200 device loaded with the payment engine software. See the MP200 Setup Guide.
The easiest way to get started with the middleware SDK is to download and build the demo application:
- Pair your Castles MP200 Terminal.
- Make sure you have the latest Xcode downloaded from Apple, a supported iOS device, and a Castles MP200 loaded with the latest terminal software.
- Download the latest demo application.
- Extract the zip and open the enclosed project "Demo App/PaymentEngineDemo".
- Make sure you add Apple's "ExternalAccessory.framework" into the project.
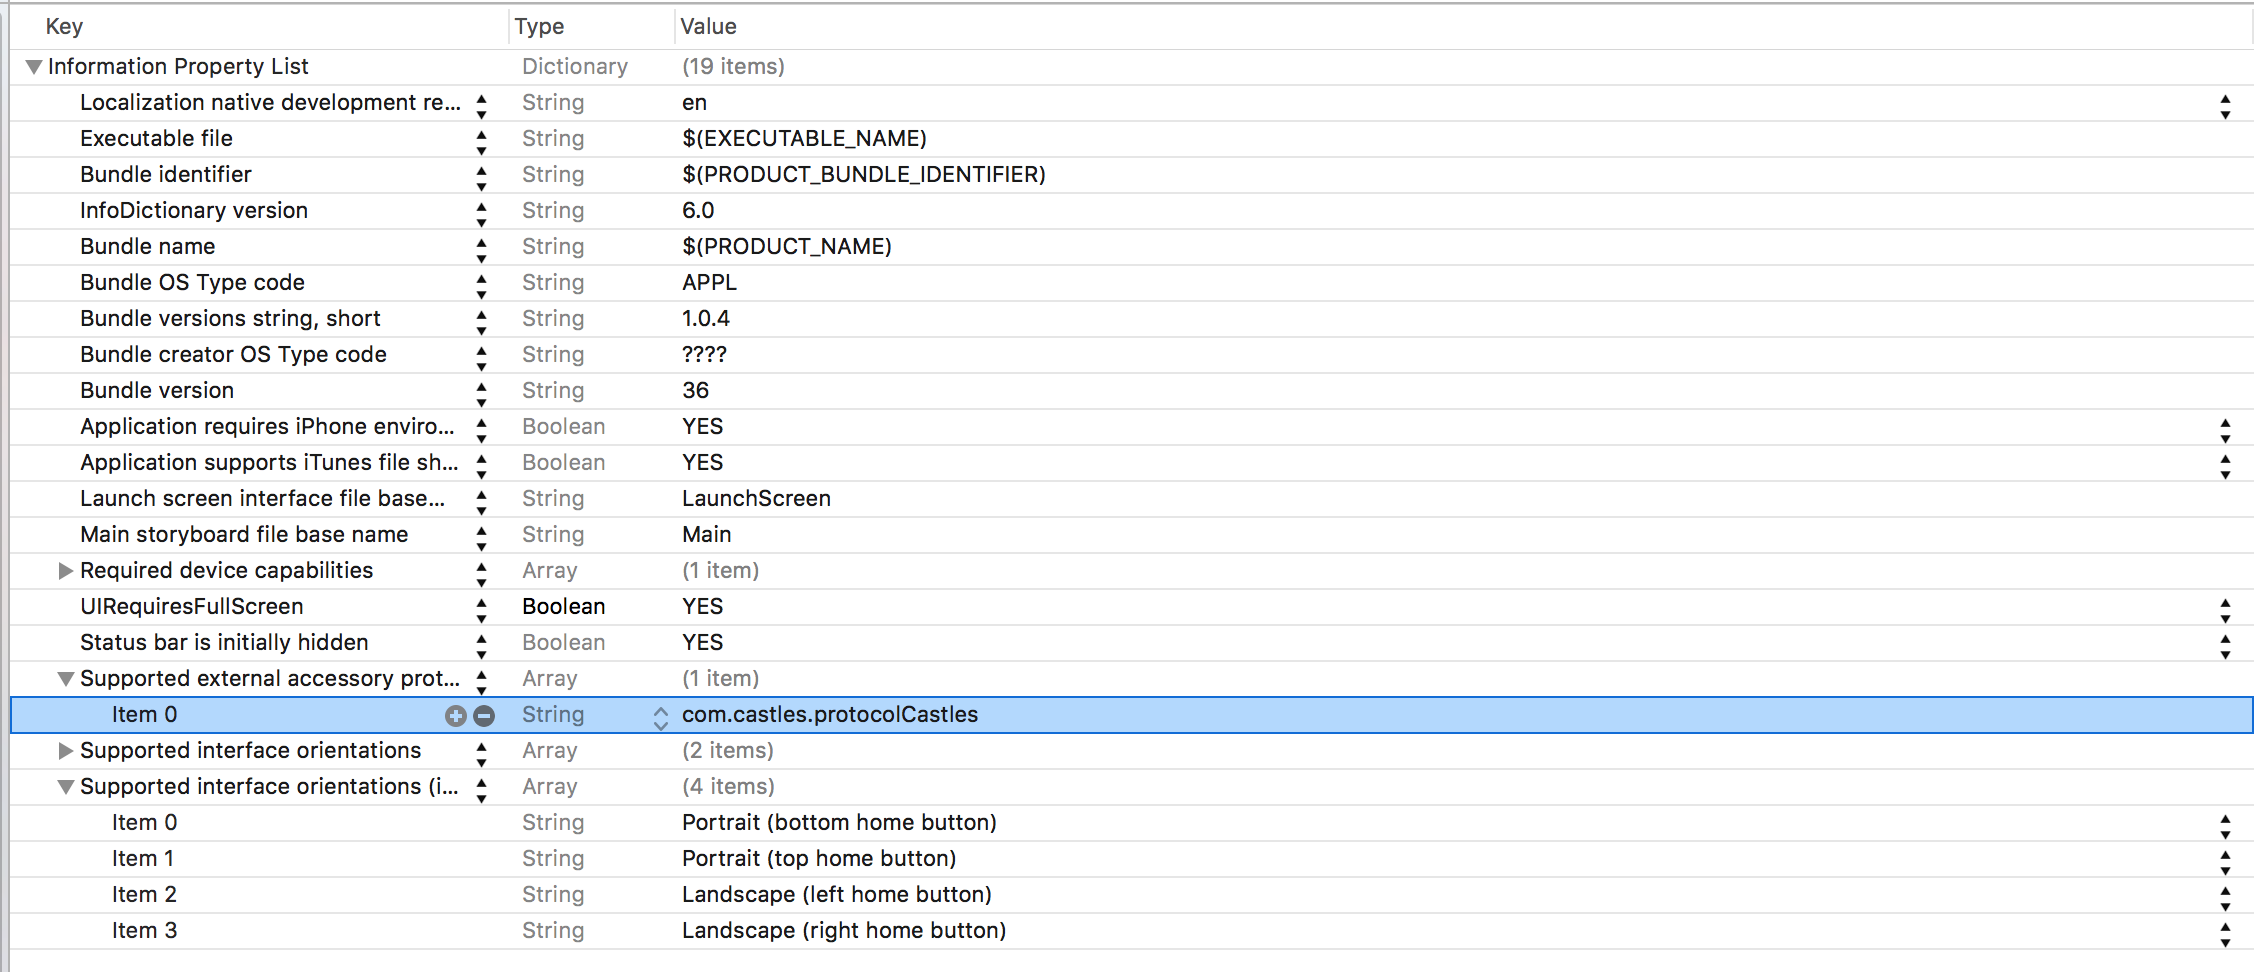
- Add the following to .plist file to be able to connect to the Castles MP200.
- Be sure to set the source key (apikey) and PIN. If you do not already have them, you can set a new api key up in your merchant console. For assistance contact integration support.
    //For production processing comment this line out
    middlewareSettings.currentMode = @"sandbox";

    // Place your sourcekey and pin here before doing any transaction
    middlewareSettings.sourceKey = @"Your Source Key";
    middlewareSettings.pinNum = @"Your Pin";
You are now ready to build and run the iOS demo app on your device.
SDK Usage Overview
Set Up
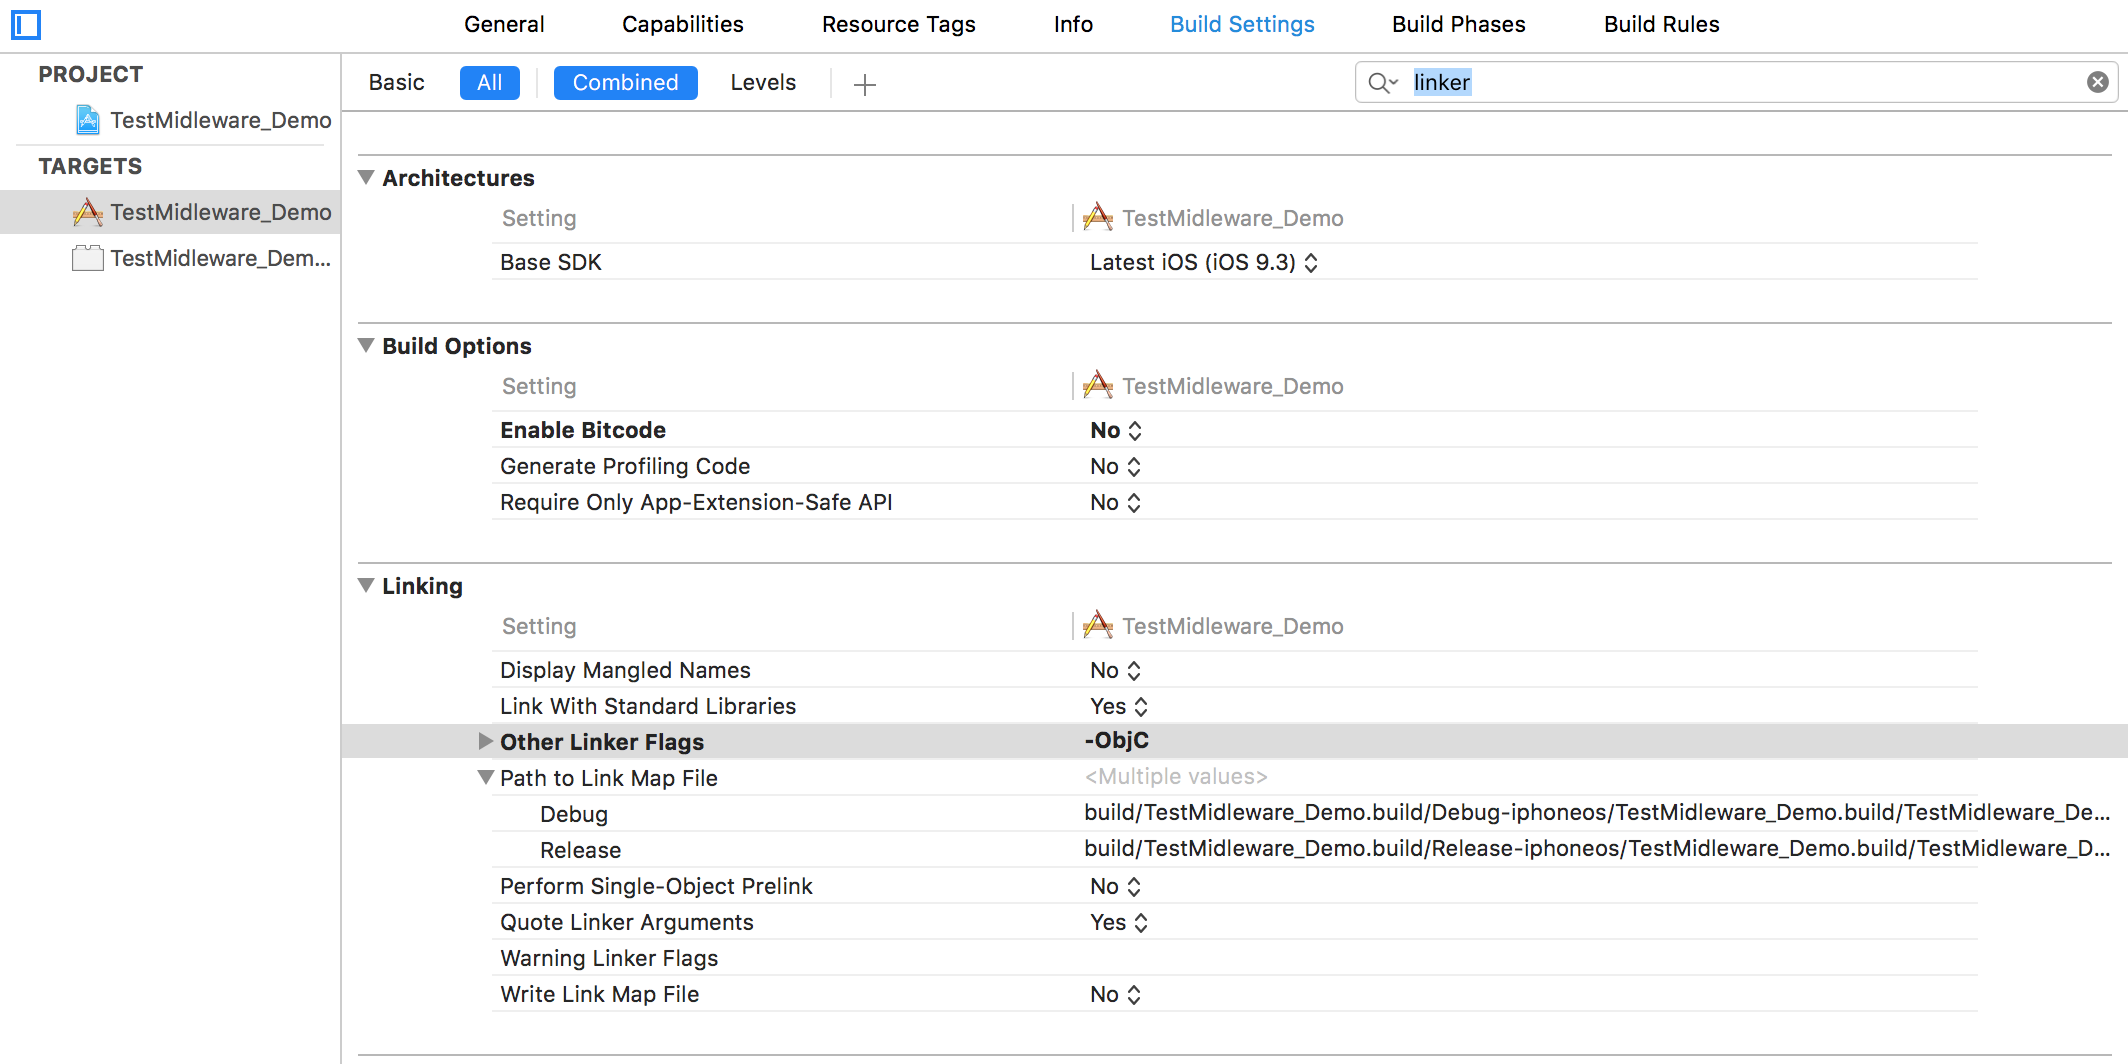
Select your project under "Targets", then go to "Build Settings", and type "linker" in the search. Then go to "Other Linker Flags", and type in "-ObjC". This will include all the files in the library.
For iOS 11.0+, add the below requirement to your Info.plist

Instantiation
The first step is to instantiate PaymentEngineMiddlewareSettings and PaymentEngineMiddleware classes:
- PaymentEngineMiddlewareSettings - This class is where you setup all the settings that the library support such as, enable/disable EMV, enable/disable Tip, source key, etc. Please visit PaymentEngineMiddlewareSettings for more info.
- PaymentEngineMiddleware - This class contains all the methods to communicate with the castle device. Please visit PaymentEngineMiddleware for more info.
.h File

#import "PaymentEngineMiddlewareSettings.h"
#import "PaymentEngineMiddleware.h"

PaymentEngineMiddlewareSettings *middlewareSettings;
PaymentEngineMiddleware *middleware;

.m File

#import "PaymentEngineTransactionResponse.h" // Needed for transactionComplete delegate method

middlewareSettings = [PaymentEngineMiddlewareSettings sharedManager];

middlewareSetting.currentMode = @"Production";
middlewareSetting.sourceKey = @"Your Source Key";
middlewareSetting.pinNum = @"Your Pin";

//The below setting values are optional, by default they are set to false
middlewareSetting.isTipEnable = true;
middlewareSetting.enableDebugLog = true;
middlewareSetting.allowEMVTransaction = true;

//---------------------End---------------------

/**
  * If the  MP200 is already paired to the ipad/iphone
  * This will automatically connects the app to the MP200
  */
middleware  = [PaymentEngineMiddleware getInstance];
[middleware setDevice:@"castle" :self];
- setMode - Options are Sandbox and Production. Use "sandbox", for testing and development. Once the app is ready for production, change mode back to "production". The value is not case sensitive.
- sourceKey and pinNum - Merchants can login to our console to grab those values.
- middleware setDevice - First parameter sets the name of the device the middleware will connect to, and the second parameter sets the middleware to self, allowing the current class to use the callback method from PaymentEngineMiddleware.
Delegate methods
/**
 * The below two callback methods get call base on the connectivity status of the MP200
 */
-(void)deviceConnected;
-(void)deviceDisconnected;
Starting a Transaction
Once a connection is established between the iphone/ipad and the payment device, the next step is to start the transaction.
   //Creates an empty dictionary objects to hold all the transaction info
    NSMutableDictionary *transDict = [NSMutableDictionary new];

/**
  * Sets the basic info that is needed to start a transaction
  */
   [transDict setObject:@"cc:sale" forKey:@"command"];
   [transDict setObject:@"40.00" forKey:@"amount"];
   [transDict setObject:@"10000" forKey:@"invoice"];
   [transDict setObject:@"This is my first middleware transaction" forKey:@"description"];

   //Use the stratTransaction method from the PaymentEngineMiddleware class to start the transaction.
    [middleware startTransaction:transDict];
After a Transaction Completes
After a transaction finishes, the delegate method transactionComplete will be called.
-(void)transactionComplete :(PaymentEngineTransactionResponse *)transResponse
{
        NSLog(@"Transaction Result: %@", transResponse.Result);
        NSLog(@"Transaction Status: %@", transResponse.Status);
        NSLog(@"Transaction Error: %@", transResponse.Error);
}
Additional Information
Tip Support
If merchants wish to support tip amounts, there are several options available:
Prompt for tip in app
- The developer will prompt for tip in the UI of their application
- startTransaction is called with the tip field present in the transDict ( NSMutableDictionary ).
- Amount field should include the tip amount in the total.
- Works with all card types, regardless of supported CVMs.
- Will work regardless of the terminal config.
Prompt for tip on terminal
- prompTip parameter in PaymentEngineMiddlewareSettings should be set to be true.
- Terminal will prompt customer to enter tip amount.
- Tip amount is added onto the original amount and passed in the transDict ( NSMutableDictionary) for the total auth amount.
- Works with all card types, regardless of supported CVMs.
- Will not work with the Tip Adjust terminal config. Use the All CVM base config and make sure to enable_tip_adjust is set to false.
Adjust tip post authorization
- startTransaction is called with amount field NOT including tip amount.
- After authorization, tip is typically entered on paper receipt in conjunction with signature.
- startTransaction is called again with the amount field set to new total (which now includes the tip amount), the tip field set to the tip amount and the refNum field set to the transaction refnum received during the original authorization.
- PIN CVM must be disabled and will NOT work with cards that require PIN CVM.
- Terminal must be configured for Tip Adjust using setTerminalConfig method Use setTerminalConfig(TerminalConfig.getTipAdjustConfig());
Software Updates
The developer will need to maintain a current version of the payment engine SDK. In addition to checking the version of software on the terminal, the SDK also cross checks against the version of the SDK library. If a developer allows the SDK to get too far out of date, it may not be able to support newer devices due to version incompatibility.
Pairing Device
- On the MP200 device press and hold the Bluetooth button until the device requests PIN
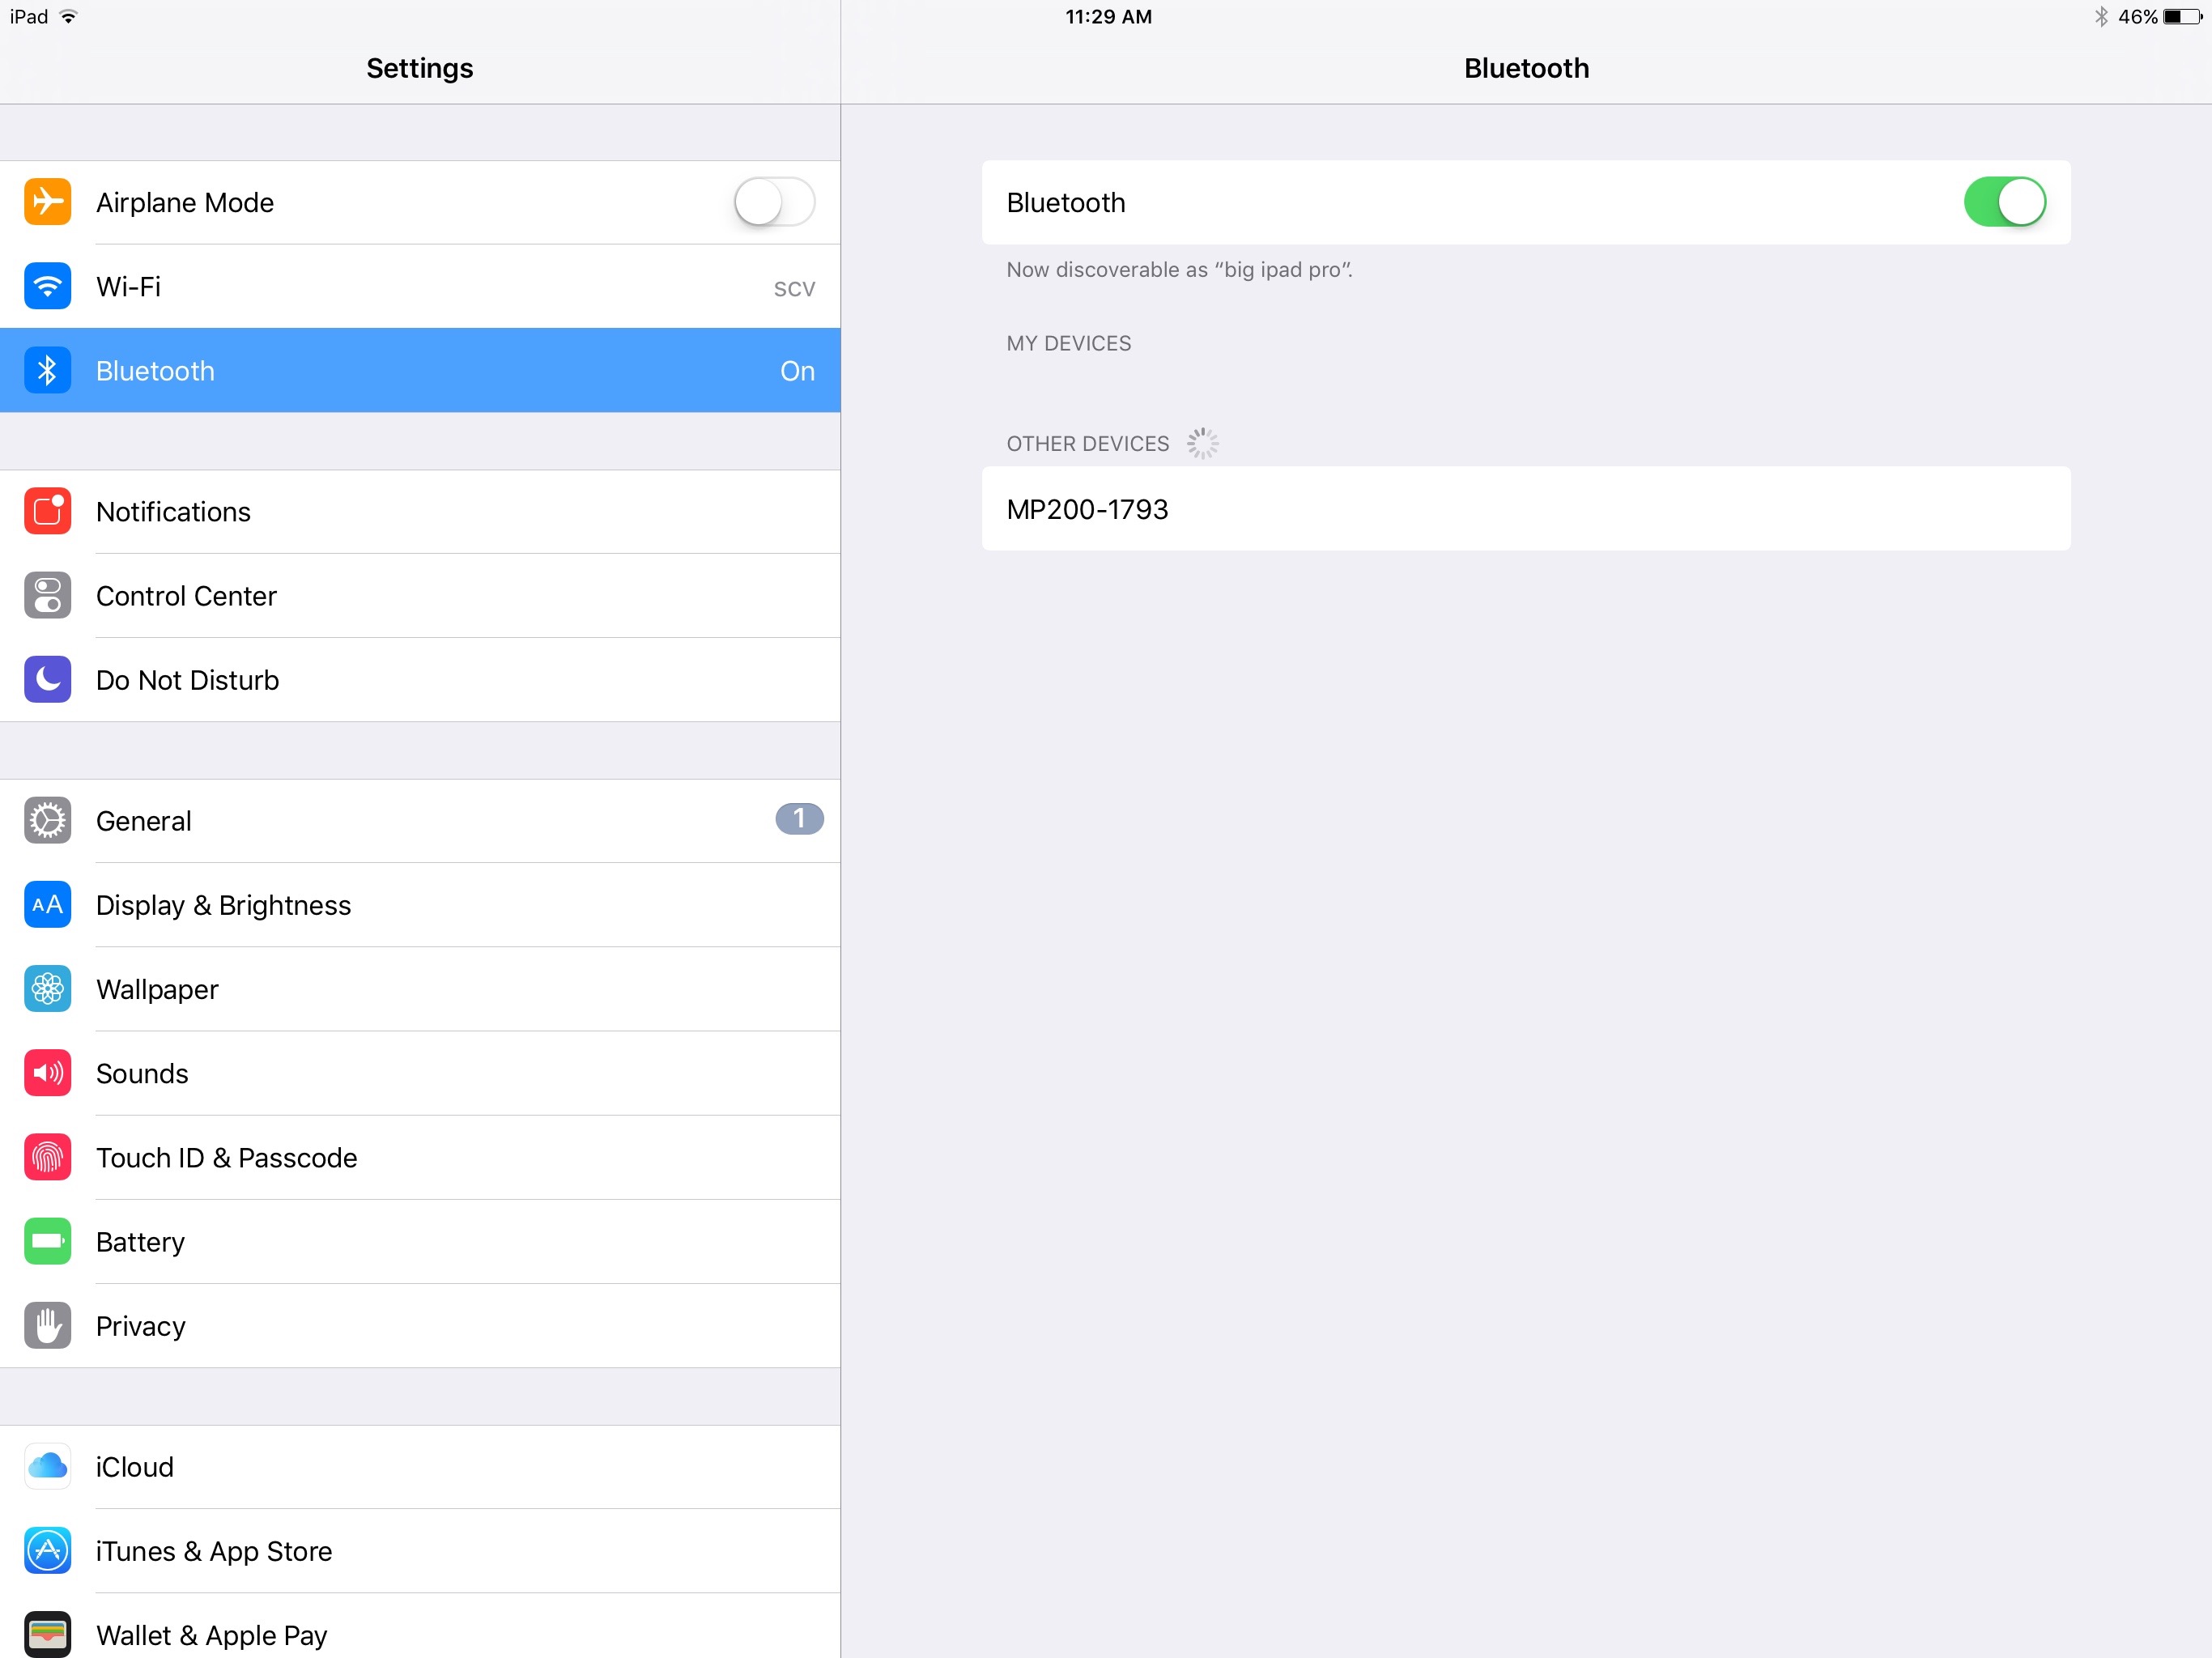
- Go to iPhone/iPad Settings-->Bluetooth-->Enable Bluetooth-->Select the MP200 device
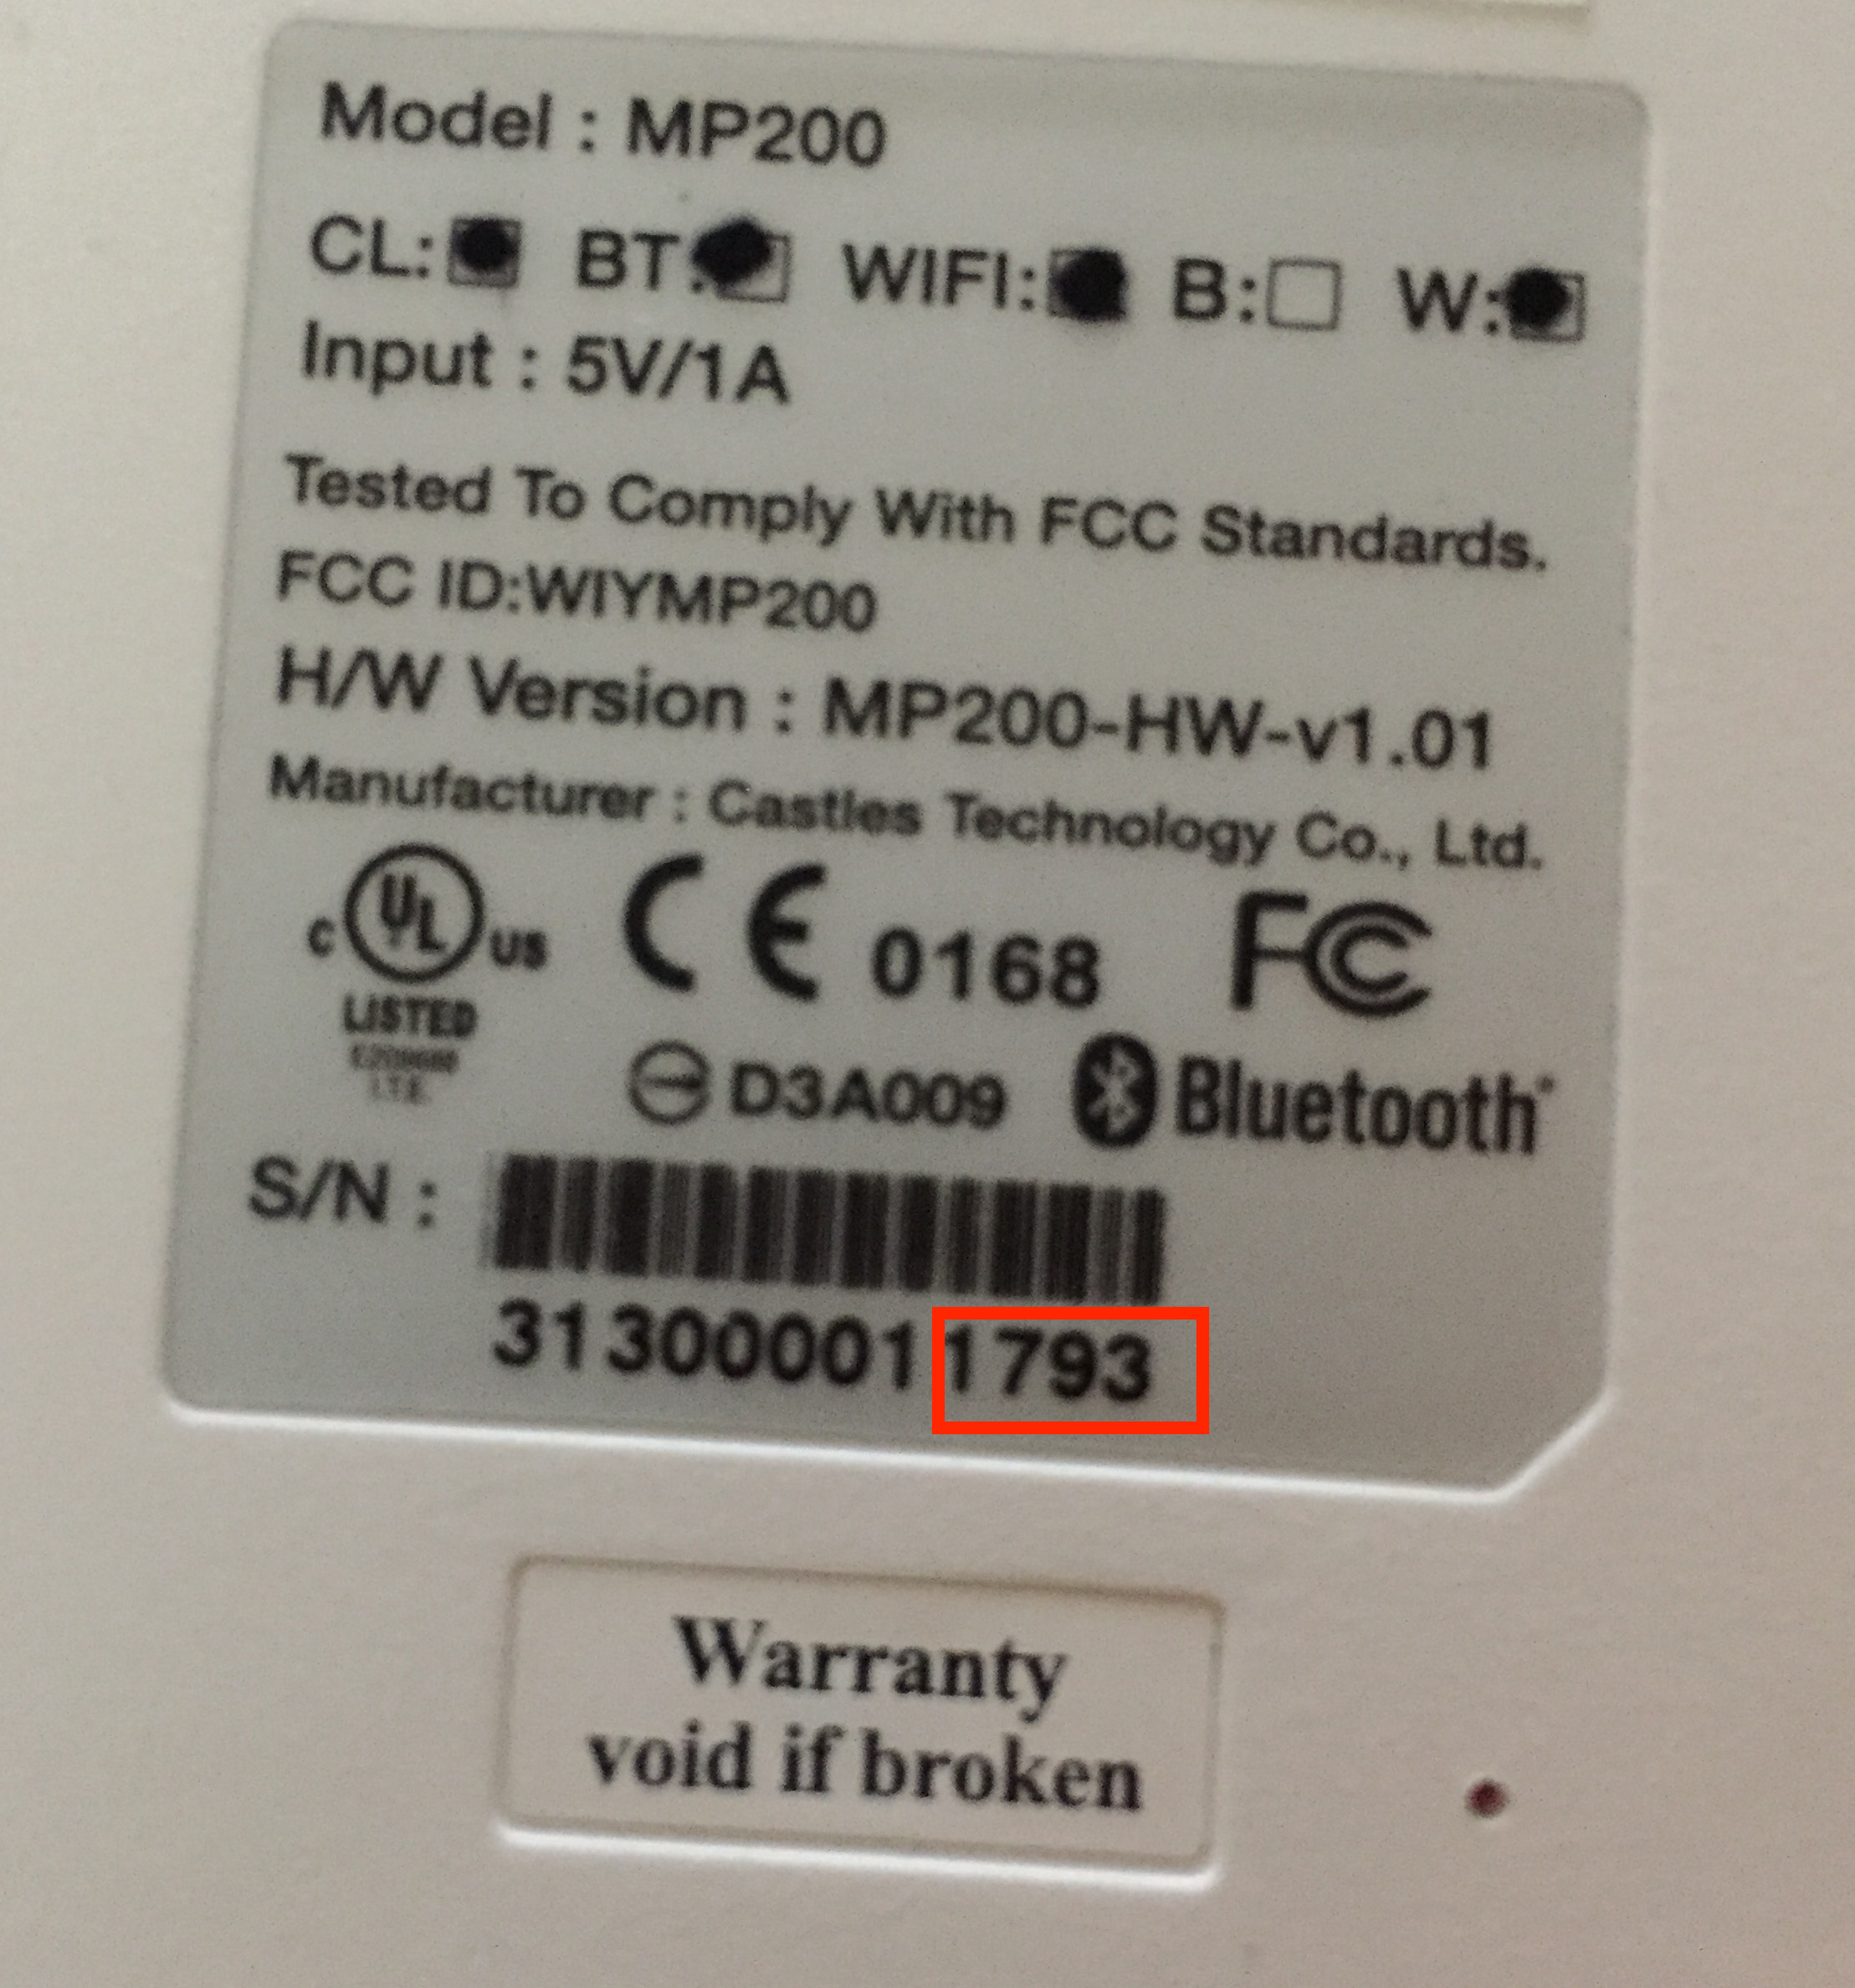
- If you have multiple MP200 devices, find the last 4 digits of the S/N (serial number) on the back of the MP200. See below.
- In our case, we would select MP200-1793 from the iPhone/iPad.
- Once the device connects to the MP200, a PIN will pop up on the mobile device screen. See below.
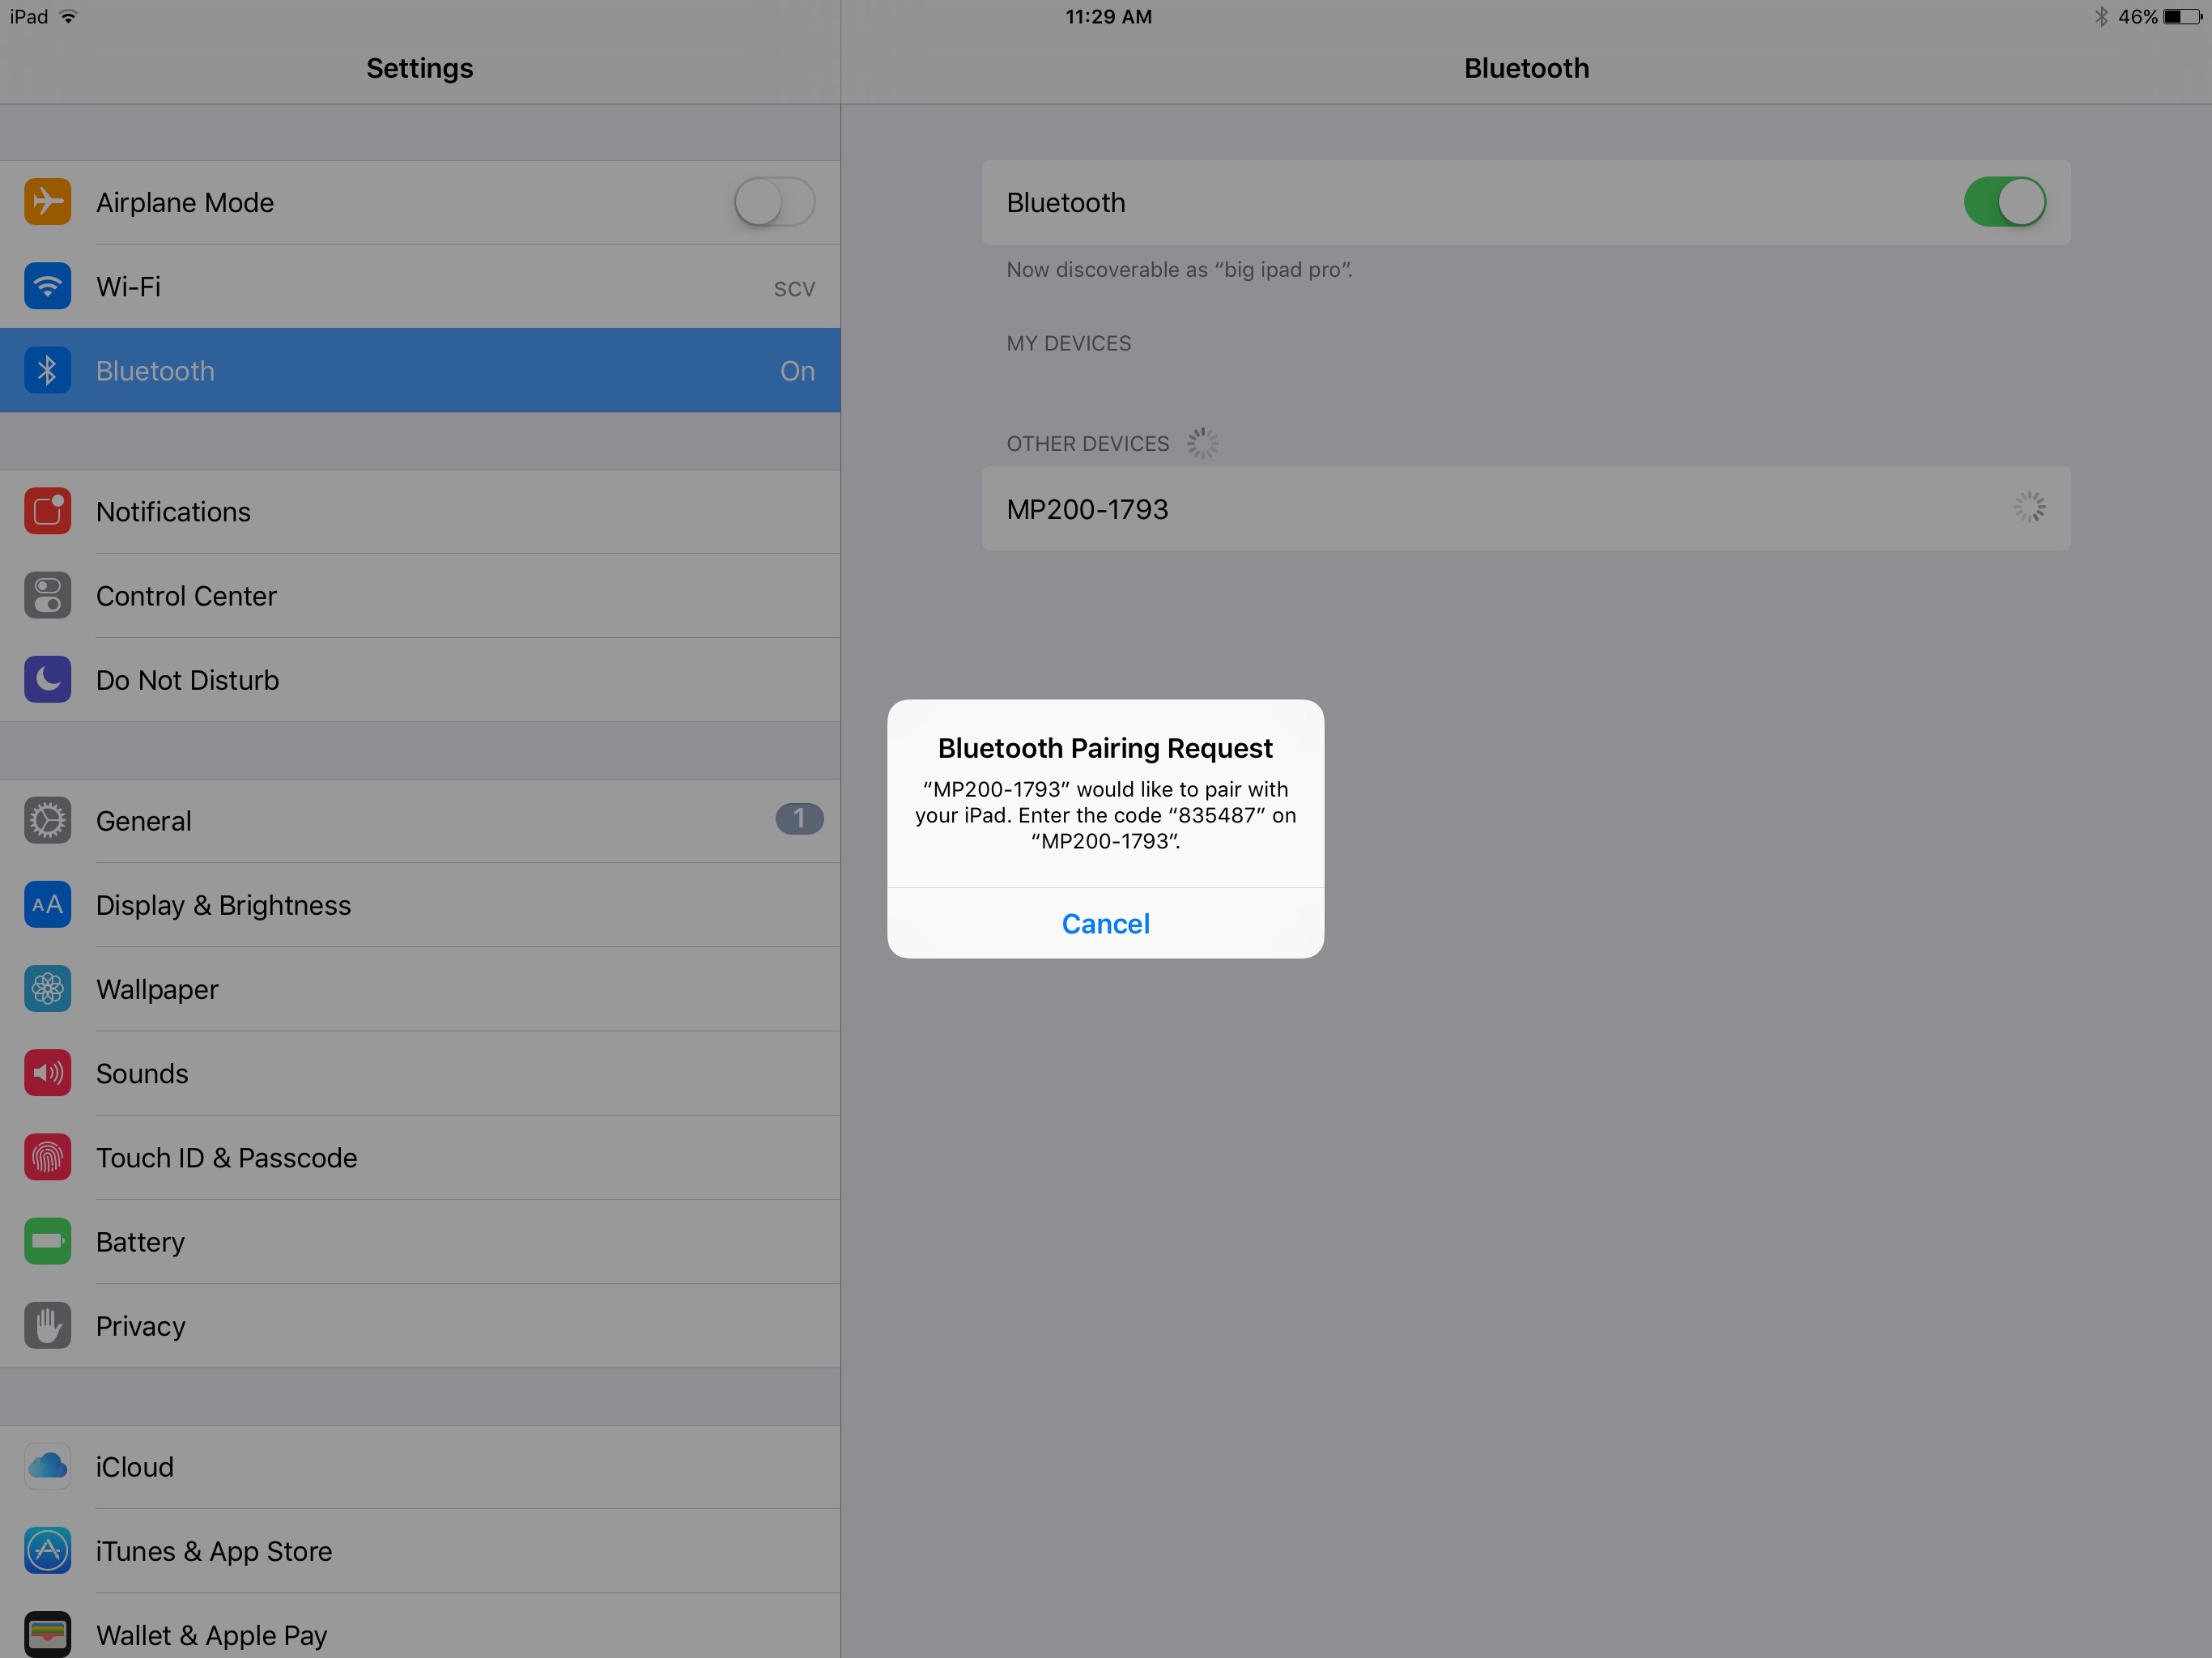
- Enter the pin into the MP200.
- Wait until the MP200 displays a green check mark and "OK." On your phone/tablet you should see the MP200 is "Connected," as shown below.
 Note: If the Castles MP200 device is to be used with multiple phones/tablets then the MP200 device must be unpaired from any unused mobile devices.